Setting Up
Set up your PlayStation game console according to its Instruction Manual. Make sure the power is off before inserting or removing a compact disc. Insert the GHOST IN THE SHELL disc and close the disc cover. Insert a Game Controller in Controller Port 1 and turn on the PlayStation Game Console. The game will begin with an animated sequence. Press the START button at any time to reach the Title Screen. At the Title Screen, press the START button to begin your mission.
Title Screen
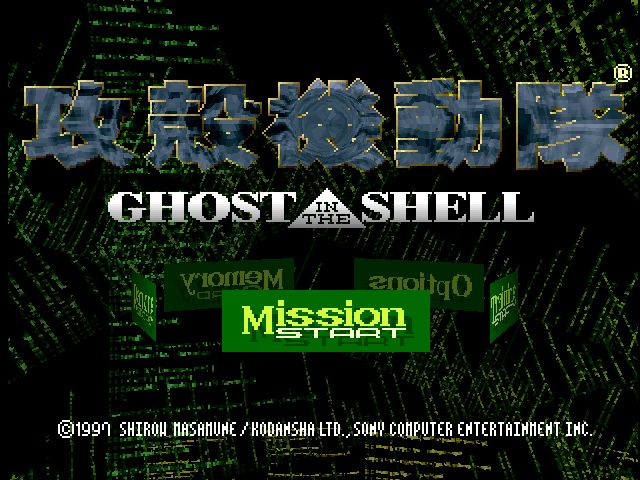
As the opening movie ends, the Ghost in the Shell title screen is displayed. You can skip any movie sequence by pressing the START button. There are 5 options in the Title Screen. To cycle through the options, press the Directional buttons Left/Right. Make your selection by pressing the START or button. During Sub-menu display, you can return to the Title Screen at any time by pressing the button.
Mission Start
When you select Mission Start at the title screen, it opens a selection window from which you can select any previously completed level. Select by pressing the Directional Buttons Left or Right, then press the START or button.
If you have not completed any of the Missions, you will only be able to select Mission 1.
Training Start
By selecting Training Start, you will go directly to your Fuchikoma in the training area. See page 24 for information on training procedures.
Options
There are 7 options to change in the Option Screen. Select with the Left/Right Directional Buttons and press the START or button to confirm. During any Sub-menu display, you can return to the previous screen without changing the settings by pressing the button. Your current settings are displayed in the lower part of the screen.
Return to the Title Screen.
Select the button configuration for your controller. Choose from type-A through type-D.
Select the sound type: Monaural, Stereo, or 3-D Effect Stereo (note: when you select 3-D Effect, turn off TV surround sound.)
Select the screen type:
•
Normal - Play with the regular TV monitor setting.
•
Wide - Play the game through a wide angle lens view.
Select to view the animations during the game.
•
On - View the animation cut-scenes as they arise.
•
Off - Remove all cinemas from the gameplay
Select to view mission descriptions during game.
•
On - View the briefing segments before each mission.
•
Off - Remove all mission descriptions from the gameplay.
View all cinema scenes previously seen. Press the Up/Down Directional Buttons to highlight the movie scene and press START or the * button to select. Training Mode evaluations can also be replayed here.
Memory Card - Save & Load
SAVE
Save your progress to a Memory Card. Highlight SAVE and press the START or * button. Next, select the block to save by pressing the Up/Down Directional Buttons. Press START or * to select the block. Finally, choose OK to confirm the save, or CANCEL to change the selection. The ▲ button will also cancel your selection.
LOAD
Read your saved data from a Memory Card. Highlight LOAD and press the START or * button. Next, select the game to load by pressing Up/Down Directional Buttons. Press START or * to select the block to load. Finally, choose OK to confirm the load, or CANCEL to change the selection. The ▲ button will also cancel your selection.
Before you Save or Load, make sure a Memory Card is inserted into the game console. You cannot save or load games without a Memory Card. Do not remove or insert the Memory Card while you are saving/loading games. You can only access the Memory Card in Memory Card slot 1.
Score Ranking
If your score is sufficiently high at the end of the game, you will be allowed to enter your initials. The ranking displays the top 5 scores for the Mission Mode and Training Mode.
Ranked in order by score, the Mission Mode shows how many targets have been destroyed.
Ranked in order by score, the Training Mode displays the Training Class each player has achieved.
Controller
Select to change the Controller configuration to one of four possible configurations.
How To Play
Game Screen
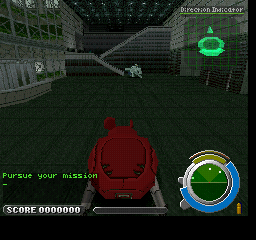
Displays the score, enemy positions, target positions, and mission area with the Fuchikoma in the center.
Displays remaining shield/health. When it turns entirely red, the Mission has failed and your game is over.
Displays danger level according to remaining shield energy and enemy positions.
Displays lock on status.
Displays the number of grenades left in your inventory.
Displays different messages at various times.
Indicates which enemy your missiles are Locked onto.
Marks all enemies that approach your Fuchikoma within a valid attack range. This will disappear within a short period of time.
.png)

.png)


 (v1.0).png)
_1.png)

.png)