MEMORY CARD slot 2
MEMORY CARD slot 1
USB connector
S400 i.LINK connector
controller port 1
controller port 2
RESET button
(OPEN) button
Setting Up Your PlayStation 2
Set up your PlayStation®2 computer entertainment system according to the instructions in its Instruction Manual. Make sure the MAIN POWER switch (located on the back of the console) is turned on.
Press the RESET button. When the power indicator lights up, press the OPEN button and the disc tray will open. Place the Lethal Skies II disc on the disc tray with the label pointing up. Press the OPEN button again and the disc tray will close.
Attach game controllers and other peripherals, as appropriate. Follow on-screen instructions and refer to this manual for information on using the software.
How to Play
Place the Lethal Skies II disc correctly in the PlayStation 2 computer entertainment system and press the RESET button. Press the START button during the opening movie to call up the title screen and the main menu. •
NEW GAME: Start the game from the beginning. (page 16)
•
CAMPAIGN: Play from where you left off last time. (page 16)
•
TRAINING: Practice your flying skills. (page 15)
•
2 PLAYER: Play in 2-Player mode
•
THEATER: Play back replay data or a prerecorded demonstration. (page 24)
•
DATA: Save or load a game. (see below)
•
OPTIONS: Change game settings. (page 7)
Save/Load
You can save data either at the completion of each mission in the SAVE screen or by selecting DATA from the title screen. Select your file name, and the old data will be written over by the new data.
Load data from the DATA menu by selecting the file you want to load.
•
Total Number of Enemies Shot Down
When you're loading data, select LOAD GAME from the DATA menu and choose the file you want to load.
CAMPAIGN automatically loads game data saved on a memory card (8 MB) (for PlayStation 2), allowing you to continue gameplay where you previously left off. If no memory card (8MB) (for PlayStation 2) is inserted or if there is no previously saved data on the card, CAMPAIGN will start a new game. Options
Move the left analog stick up and down to select items, then press the X button to confirm. Move the left analog stick left and right to change the selection.
Controller 1/2
Allows you to change the settings of controllers 1 and 2.
•
OPERATION MODE: Changes flight operation mode between NOVICE and REAL.
•
VIBRATION: Turns the vibration mode on or off.
•
SENSITIVITY: Adjusts the response time of the controller.
•
VIEW MODE: The R3 button shows the GPS map or the Rear view.
Sound Volume
Adjust the volume of the background music, sound effects, voices and movies.
Effects
•
HIGH-G EFFECTS: Turns High G-force effect on or off.
•
MOTION BLUR: Adds a small amount of blur to the picture for greater sense of speed.
•
SUBTITLES: Turns subtitles on or off.
•
DEBRIEFING: Turns debriefing at the end of each mission on or off.
Screen
Adjust color and brightness of the screen.
Brightness
Adjust screen brightness.
Color Bar
Displays a color bar. First, adjust the contrast of your television display so that the white square on the bottom of the screen (100%) and the white on the bar on the left side of the screen (75%) has a visible contrast between the two.
Then, adjust the brightness of the three black color bars on the right bottom by making the two left bars the same brightness, and the black bar on the far right appears faintly black. (Note: The color adjustment is on the television and not the PlayStation 2 computer entertainment system.) Multifunction Display (MFD) Camera
When a target is locked on, the target is magnified and its information is displayed.
Multifunction Display (MFD) Radar
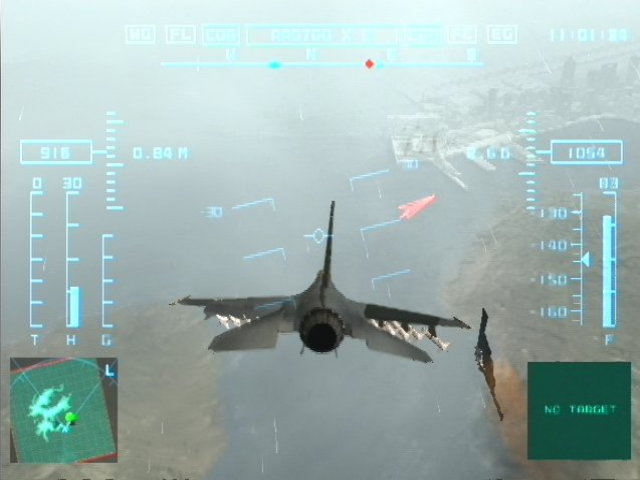
Turn map projection on the radar (GPS mode) on and off with the ↓ directional button. Use the ← and → directional buttons to change the display range to S: SHORT, M: MIDDLE, L: LONG and A: AUTO.
Allies are represented by green and blue, objective enemy targets are red and other enemy targets are yellow.
GPS Display (Pause Screen)
When the START button is pressed during flight, the game will pause and the GPS display will show the combat airspace. To resume the mission, select RESUME or select ABORT to quit.
Radar
First, look at the radar. Move your fighter so that it travels toward the red marks. (In the V zone.)
•
Objective Enemy Fighters (red)
•
Enemy Ground Targets (yellow)
•
Friendly Carriers, Etc. (blue)
•
Your Fighter (blinking in blue)
•
Objective Enemy Ground Targets (red)
•
Accompanying Aircraft (blue)
Lock-On Gauge
The lock-on gauge is used for missiles, and a yellow square indicator appears over enemies that can be damaged by your armaments. When an enemy comes into range, the lock-on gauge turns red.
When the lock-on mark becomes fixed in the gauge, the SHOOT message
.png)

.png)



.png)

.png)



.png)




_1.png)

.png)



_1.png)