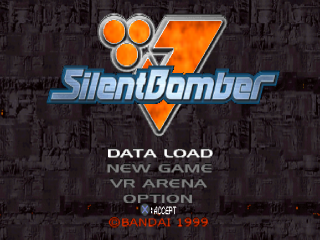
Title Screen
After the opening demo, the Title screen appears with four mode choices. Use the Directional Pad (or Left Stick) Up/Down to select, and press the Button to execute.
Data Load
To load saved game data, insert the Memory Card with the saved data into the PlayStation Main Unit. Load the data to continue the game. This is compatible with both 1 and 2 Memory Card Slots. The completed mission number and game time will be shown on the right side of the Data Load screen. This information will also be displayed on the Memory Card Menu screen for the PlayStation Main Unit as the Silent Bomber Icon Select Menu. New Game
To start a new game.
VR Arena
To play a battle match for 1 or 2 players, featuring members of Operation Toroy and Planets' Union of Justice.
Option
To change various game settings.
Key Config
To change the function of E-Unit buttons. Use the Directional Pad (or Left Stick) Up/Down to select the function you want to change. Press the button you want to change, then select , , , , L1, L2, L3, or L4 button to execute.
Be careful not to overlap the buttons on each function, as you cannot exit the OPTION screen if any button is overlapped.
Sound
To adjust Stereo/Mono, BGM, and SE volumes on your TV speakers. Use the Directional Pad (or Left Stick) Up/Down to select the item, and Right/Left to change the setting.
Screen
To adjust the positioning of the screen. Use the Directional Pad (or Left Stick) Right/Left to adjust the X value (right/left position), and Up/Down to adjust the Y value (up/down position).
Vibration
To turn the Vibration function On/Off when using the DUALSHOCK™ analog controller.
Caption
To turn the Information display On/Off.
Exit
To leave the OPTION Menu and return to the TITLE screen.
Movement
Basic movement is made by the Directional Pad (or Left Stick). However, there are special movements required throughout the mission. The Burst Drive movement is especially helpful.
Jump
Press the Button. This action is very useful for jumping over things or evading enemy attacks. It's possible to set the E-Unit by using the Lock On function during the jump. Climbing Jump
Press the Button to jump forward to the wall, then press the Button again. This action is effective when you need to climb a high barrier. Burst Drive
Press the Button twice in rapid succession. This action lets you move a short distance with extreme speed for quick evasion. Be quick to grasp the situation and make your move. Screen Elements
•
SELECT WINDOW: Shows selected MATERIAL LIQUID and the number of remaining capsules. •
VITALITY GAUGE: When it's empty, you're dead. You can restore your vitality with a HEAL AMPULE.
•
SHIELD LEVEL: When the SHIELD is set, you can reduce the damage from attack. The higher the level of SHIELD, the higher the level of protection.
•
SCORE DISPLAY: Shows points earned in the mission.
•
BOMB GAUGE: Shows the number of bombs available. The color of the gauge changes as you set bombs.
•
TARGET DISPLAY: Shows the number of Destroyed Targets vs. All Targets. (Shows only when the mission requires destruction of the target.)
Time Limits
There are time limits on some missions. With time limits, keep an eye on the TIME COUNTER, because the game is over when it gets to zero.
Customizing E-Unit
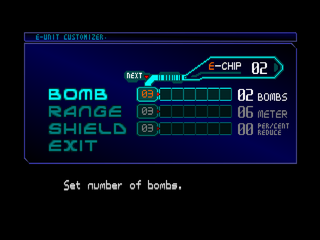
As you advance to the core of DANTE, the missions get harder and harder. Improve the capacity of your E-Unit by tuning it up with E-Chips collected during the mission.
Tuning up can be done anytime during the mission. When you press the Start Button, E-UNIT appears on the COMMAND menu. You can also tune-up when E-UNIT shows on the INTERMISSION screen at mission's end.
Customizer
Change the tune-up level by using the DIRECTIONAL PAD Right/Left.
•
Number of E-Chips needed for the next level tune-up
•
Number of E-Chips available for use
•
Current level of tune-up
Tune-Up Options
•
BOMB: Determines the number of bombs you can set at one time.
•
SHIELD: Sets the Defense Shield Level.
•
RANGE: Sets the Lock-On range.
•
EXIT: Ends the tune-up and returns to the COMMAND menu.
You'll want to set different tune-ups to take advantage of different battle situations. You get to choose the best tactics.
Tune-Up Examples
•
BOMB TUNE-UP: Increase the number of bombs you can use to get an advantage against well defended enemies.
•
RANGE TUNE-UP: You can increase the range at which Lock-On operates, improving your chances against flying enemies.
•
SHIELD TUNE-UP: This setting maximizes your defensive Shield, ideal for battle against enemies that are heavily armed.
Other Commands
•
OPTION: To change various game settings.
•
RESET: Ends the game and returns to the TITLE screen. (The game will not be saved.)
•
EXIT: Leaves the COMMAND menu and returns to the mission.
**Mission Brief
.png)


.png)