Getting Started
Controller Layout
•
left analog stick (L3 button when pushed down)
•
right analog stick (R3 button when pushed down)
Starting Up
Set up your PlayStation 2 computer entertainment system according to its Instruction Manual. Make sure the MAIN POWER switch (located on the back of the console) is turned on. Press the RESET button. When the power indicator lights up, press the open button and the disc tray will open. Place the MARVEL VS CAPCOM 2 disc on the disc tray with the label side facing up. Press the open button again and the disc tray will close.
Attach game controllers and other peripherals as appropriate. Follow on-screen instructions and refer to this manual for information on using the software.
DUALSHOCK®2 Analog Controller
MARVEL VS CAPCOM 2 is best played with the DUALSHOCK®2 analog controller. For one player, connect the controller to Controller Port 1. For two players, connect two controllers to Controller Ports 1 and 2.
When Vibration is set to ON, the controller will vibrate in response to game events. You can turn Vibration ON/OFF in Option mode (see page 7).
Ending the Game
To end the game and return to the Title screen, select QUIT GAME and then select YES in the Pause menu.
Starting a Game
Press START at the Title screen to begin. To make your selections on the following screens, use the directional button or left analog stick to choose and press the button to confirm.
•
Choose your fighter's Assist Type (alpha, beta or gamma), which determines the character's variable Assist and variable Combination change.
•
Select two more characters for your team.
•
Finally, choose a play speed.
Game Modes
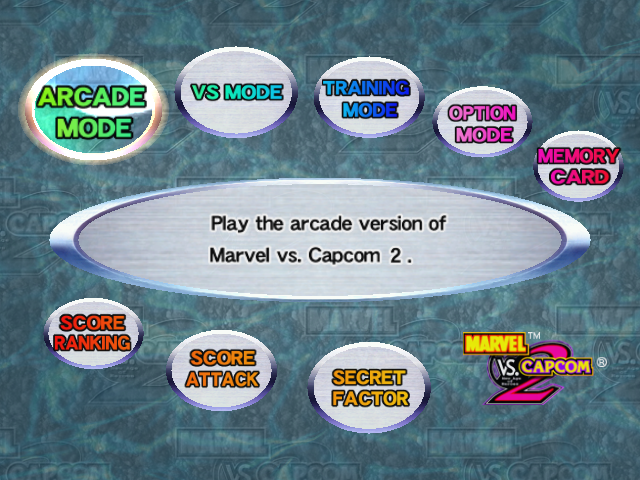
Arcade Mode
1 or 2 Player(s)
Fight against CPU opponents, one after the other. Choose three fighters from 24 warriors. Defeat all comers to win the game and see a victory ending.
Player 2 can join in any time by pressing the START button. You can continue even if you lose.
Versus Mode
2 Player Competition
Challenge a friend head-to-head. Insert two controllers into your PlayStation 2 console before starting. Choose a fighter, handicaps and stage before every match. Training Mode
1 Player
Practice your moves and combos against a CPU character. Choose your character and sparring partner.
During training, press the START button to open the Training Menu and adjust the sparring partner's settings. Use the directional button or left analog stick to make a selection and to change the setting. Press the button to confirm.
Option Mode
Adjust various game settings. Use the directional button or left analog stick to make a selection and to change the setting. Press the button to confirm.
Game Option
•
Difficulty: Adjust the difficulty level for Arcade Mode games.
•
Time: Adjust round time. When set to infinity (%), the match continues until one team wins.
•
Damage: Adjust the damage level of your character's attacks.
•
Speed: Adjust the game speed.
•
Sound: Choose STEREO or MONAURAL.
•
Default Settings: Restore original settings.
•
Exit: Return to the Mode Select screen.
Button Config
•
Buttons: Change button assignments for punches, kicks and special moves.
•
Vibrate: Turn the controller vibration function ON or OFF.
•
Command: Adjust the computer's response time (NORMAL or LONG) for Special Move commands.
•
Default Setting: Restore original settings.
•
Exit: Return to the Option menu.
Display Adjust
•
Display Adjust: Center the game screen on your TV.
•
Default Setting: Restore original settings.
Save/Load
•
Save: Save your option settings and score ranking data to an optional memory card (8MB) (for PlayStation®2). The memory card must have at least 58kb of free space in order to save.
•
Load: Load previously saved game data from a memory card.
•
Exit: Return to the Mode Select screen.
Score Ranking
View high score ranking for Arcade and Score Attack Modes.
Score Attack
1 Player
Battle CPU characters for high scores. This mode is not affected by your Option Mode settings.
Secret Factor
Check your play status and any secret characters you've unlocked.
Special Moves
The directional button/left analog stick moves are for fighters facing right. Reverse the left/right actions for fighters facing left.
Hyper Combo Gauge
The Hyper Combo Gauge builds up as you attack. When it is full, your character can perform special attacks such as Hyper Combo. You can build your Hyper Combo Gauge up to Level 5.
Hyper Combo
<A Hyper Combo command> + PP or KK (press simultaneously)
A Hyper Combo uses Level 1 gauge. See pages 16-27 for individual characters' Hyper Combo commands.
Delayed Hyper Combo
You can perform up to 3 Hyper Combos in
.png)

.png)
.png)
.png)
.png)
.png)


.png)
.png)
.png)


.png)
.png)
.png)