Starting the Game
•
Make sure the POWER switch is OFF.
•
Insert the DOOM™ Game Pak into the Game Boy® Advance slot as described in your Nintendo Game Boy® Advance instruction manual.
•
Turn the POWER switch ON.
Note: The DOOM Game Pak is for the Game Boy® Advance system only.
Game Boy® Advance Controls
All of the instructions refer to the default control scheme shown on the next page. Please note that there are several preset control configurations that may be changed through the Options menu.
•
Hurt Me Plenty: This is the normal difficulty. Don't expect much forgiving behavior from your enemies on this skill setting.
•
Nightmare!: Only the toughest, most hardened Marines play here.
Menu Options
•
OPTIONS: Select to open the Options menu.
•
LOAD GAME: You can load a previously saved game from the Load Game menu.
•
MULTIPLAYER: Start a Deathmatch or Cooperative multiplayer game (requires Game Boy® Advance Game Link® cable and at least two DOOM Game Paks). Note: The Multiplayer option appears only when a Game Boy® Advance link connection is active.
•
CREDITS: Select to view the credits.
Load Game Menu
Use the control pad to move the cursor and select the slot where you saved your last game. Press the A Button to select the game slot that you would like to play. Press the B Button to return to the Main menu.
Note: You will only be allowed to save your game after you complete a game level. When you load your saved game, you will start at the next game level with the same health and inventory amount as when you saved.
Multiplayer Setup
Multiplayer game play on the Game Boy® Advance is possible using the Game Boy® Advance Game Link® cable (sold separately). All players will need to have the DOOM Game Pak in order to play multiplayer DOOM. Make sure that each Game Boy® Advance unit is securely connected to the Game Link® cable.
The Game Boy® Advance system that is connected to the small end of the Game Link® cable will be the master system, and will choose the options for each game. Once the Game Link® connection is established, go to the Multiplayer Setup menu, and use the Control Pad to select between Deathmatch or Cooperative mode. Note: Cooperative menu option only appears when two Game Boy® Advance systems are connected.
Deathmatch Mode
Deathmatch Mode is available by linking two to four players together using Game Link® cables. Deathmatch mode lets players fight against each other in the ultimate battle for survival. No Demons, no Imps, no Cacodemons-just you and your “friends.” The player with the most frags will win the match.
Each time a player gets fragged, they will respawn in a random location in the map. When weapons, power-ups, or ammo are picked up, they will reappear later so that the level never runs dry of toys.
Cooperative Mode
Two players may link together for a Cooperative game. In the cooperative mode, you and a friend must help each other to survive the nightmarish onslaught of Former Humans, Imps, Lost Souls, and Cacodemons.
HUD Display
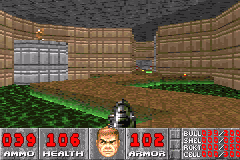
The status bar displays the same information for all modes of play.
4. Armor: Your armor helps you as long as it lasts. Keep an eye on it because when it goes, you might too.
5. Keys: You can see any keys you possess right here. There are three key colors: Blue, Yellow and Red.
6. Arms: This list of numbers shows how much ammo you can carry for each of your weapons.
Note: Deathmatch scores are displayed on each player's Automap screen.
Memory Save
The current options settings and controls configuration, as well as the last level completed, are retained in the Game Pak even if you have turned off your Game Boy® Advance system. After completing any game level, you will be able to designate where you would like your current game to be saved in any of the Game Pak's four internal EEPROM save slots.
Doors, Switches, and Elevators
•
Using Doors, Switches and Elevators: To open most doors and operate switches, stand directly in front of the object and press the B Button. When you successfully operate a switch, it will change in some way (e.g. light up, flip a handle, etc.). If a switch does not change after a couple of tries, it is probably assigned to do a task that cannot yet be accomplished.
•
Locked Doors: Some doors have security locks, and require you to have a color-coded (Blue, Yellow, or Red) security card or skull key to open them. Other locked doors are operated by a switch on a nearby wall. Rather than walking up to the door, you'll need to operate the switch. When you come to a door that requires a security card or skull key, a key or skull will flash on your Status Bar indicating which item you need to activate that particular door.
•
Hidden Doors: Some doors are hidden. Many of these can be opened by shooting at them or finding a switch. In some cases, you can walk up to a wall and press the B Button. If you've found a secret door, it will open for you. There are clues that reveal a secret door-a wall that's shifted down or has a different color, etc.
•
Elevators: You'll see platforms that raise and lower. Some platforms operate continuously, while others must be activated. Some of them may sense


_1.jpg)

_1.png)






.png)
.png)